
http://www.makingbooks.com/elastic.shtml
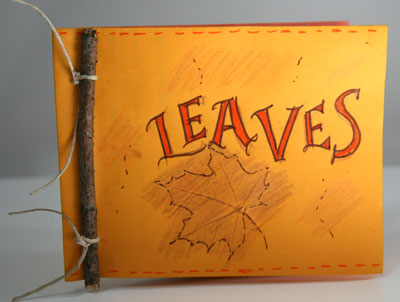
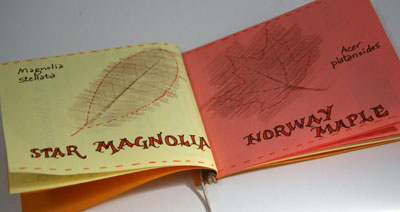
Fall is a time when we pay special attention to leaves in New England. This month's project is a Book of Leaves with leaf rubbings on each page. I tried the rubbings with both crayon and colored pencil and preferred the colored pencil, but you might decide otherwise. You could also attach the actual leaves or make leaf prints with paint.
You will need two or more pieces of paper, a stick, and an elastic or 2 pieces of cord or yarn. In keeping with my current focus on using recycled materials whenever possible, I used three pieces of paper that had writing on one side only (flyers that I was given at a conference).
1. Fold each paper in half the long way so that is long and skinny like a hot dog. If it has writing on it, the writing should be on the inside.
2. Fold each paper in half the other way.
3. Tuck the folded pages inside each other.
4. Punch two holes a little way in from the folded edge, one toward the top and one toward the bottom. I find that I am only able to punch through all the layers at once if I use 2 sheets of paper. If you use more, you may have to punch the holes in one or two sheets and then use that as a guide to mark the placement of holes for the rest of the paper.
5. Make the leaf rubbings on the pages. I think it is easier to make the leaf rubbings before you bind the book with the stick because the pages lay flatter. I punch the holes first to serve as a visual guide. If your rubbing is too close to the fold, part of it will be hidden under the binding.
6. Follow the directions to bind the book together. Because I wanted a more earthy look to my book than an elastic would provide, I used two pieces of hemp cord. I tied the two pieces together toward the end. I inserted the two ends in the top hole, pulled both pieces of cord along the back of the book and up into the bottom hole. I pulled the cord tightly and tied the two ends together in the front at the bottom hole.
Links
Why Leaves Change Color
A simple explanation written for children can be found at
http://www.sciencemadesimple.com/leaves.html
and a more detailed explanation at
http://www.na.fs.fed.us/spfo/pubs/misc/autumn/autumn_colors.htm
Big Dipper and the Colors of Autumn
Retelling of Algonquin legend which explains why leaves change their color in the fall
http://starryskies.com/articles/dln/9-97/dipper.colours.html
Tree Identification
Have a leaf with you and click on the leaf key at the bottom of the page. It will lead through a process to identify your leaf.
http://www.fw.vt.edu/dendro/forsite/Idtree.htm
No Child Left Inside
Leave No Child Inside, an article by Richard Louv in the March/April 2007 issue of Orion magazine
http://www.orionmagazine.org/index.php/articles/article/240
Richard Louv's website
http://thefuturesedge.com
Last Child in the Woods has had great impact. Giving No Child Left Behind a twist, there is a movement that grew out of the book called No Child Left Inside. I couldn't find a central website but searching No Child Left Inside will bring up many sites and blogs.
Adapted from the October 2007 issue of Making Books Monthly
Free subscriptions available at makingbooks.com.


3 comments:
Love this!
Great idea!
Just wondering if you could add a bit of advice about the leaf rubbing aspect--some suggestions about how to do it.
Thanks.
Patricia
Pam
I used colored pencils held kind of sideways. Crayons are probably easier. For that I take the paper off and use the side of the crayon. I put the leaf in between the 2 layers of recycled paper and rubbed on the top layer. If you're not sure, you can do a test on a piece of paper and then do the rubbings in the book. Or you can always glue on separate paper and then cut out and glue in the book.
Susan
Post a Comment